Monday, July 27, 2009

Paging In Sql Server 2000 Store Procedure

You have heard or at least done Paging of the gridview control on the server side. When someone talk about the paging of the data on the sql server side I was surprise how to do the paging of the data on sql server side on in the store procedure which will return data. Then I have start search on doing paging of data on the store procedure side.
Here is piece of code which is used to create the store procedure and the name of the store procedure is GetCustomer. The store procedure will take two parameter one the PageNumber and the second one the PageSize. At the beginning of the store procedure is the declaration of the variable which are used in the store procedure. First is the StartingRow and the EndingRow variable which are used to return the pageSize records by comparing the StartingRow and The EndingRow with the RowNumber of the return result set. Next variable is the TotalRecods which is used to save the total of the records and used to calculate the row number as I have discuss in my last Post, where I have discuss how to calculate row number in sql server 2000 in detail.
ALTER PROCEDURE [GetCustomer]
@PageNumber INT,
@PageSize INT
AS
Declare @StartingRow INT,
@EndingRow INT,
@TotalRecords INT

Declare @tblTemporary TABLE
(
RowNumber INT,
CustomerID VARCHAR(10),
CompanyName NVARCHAR(200),
ContactName NVARCHAR(200),
Country NVARCHAR(50)
)

Set @TotalRecords =(Select Count(*) from Customers)
Set @EndingRow = @PageNumber * @PageSize
Set @StartingRow = @EndingRow - @PageSize

Insert INTO @tblTemporary
Select @TotalRecords -(Select Count(*) from Customers WHERE Customer.CustomerID < CustomerID) AS RowNumber,
CustomerID,CompanyName,ContactName,Country from Customers AS Customer

Select * from @tblTemporary
Where RowNumber> @StartingRow AND RowNumber <= @EndingRow
Next is the declaration of the table to save the return record set. Here I have included the required columns which I need to display to user plus the addition column RowNumber, which is used to filter the records based on the StartingRow and EndingRow. After the declaration of the variables next is the assignment statements. In the first of the assignment statement, TotalRow is assign value by selecting the Count(*) from the customer table.Next is to calculate the EndingRow value by multipling the PageNumber with PageSize and at the last assignment statement, calculating the StartingRow by substracting the PageSize from the EndingRow variable.
In the next statement, calculating the Row Number and required columns from the customer table and inserting the returned record in the @tblTemporary table. At the end of the store procedure selecting the records from the tblTemporary table and place the where clause so that the RowNumber of the tblTemporary table will be in between the StartingRow and EndingRow.

Note: Replace the alter keyword at the start of the store procedure with the create keyword so that new store procedure will be created.

The database for this store procedure is the northwind and table is the customer table. After creating the store procedure you can run these commands to see the result

exec getCustomer 1,25
exec getCustomer 2,25


All and any comments / bugs / suggestions are welcomed!


Saturday, July 25, 2009

Spliting Comma Seperated Values in Sql server 2000

Unfortunately, there is no built-in support for arrays in SQL Server's T-SQL. SQL Server 2000 did add some new datatypes like sql_variant, bigint etc, but no support for the much needed arrays. There are some situations, that require the ability to pass a list of values to a stored procedure. Think about a web page, that lets the user select one or more of his/her previous orders, on submit, retrieves complete information about the selected orders. In this case, passing a list of selected order numbers to the stored procedure, in one go, and getting the results back is more efficient, compared to calling the same stored procedure for each selected order number.
Since, we cannot create arrays of variables or input parameters or columns in T-SQL, we need to look for workarounds and alternatives. Over the years, programmers developed different techniques, some of which are not so efficient, some efficient, but complex. The most popular technique is to pass in a list of values, separated by commas (CSV). With this method, the normal input parameter of the stored procedure receives a list of say, OrderIDs, separated by commas.
In this post I which is taken from the this link you can read this article for further reading, I will try to make a table from the CSV. I have divide code in two parts List 1 contain the declaration of the variable and List 2 contain the execution statements. And at the end full code combining the List 1 and List 2.
Here is the List 1 code which has the declaration of the variables. The @strCommSeparatedValue will contain the Comma separated value I have set the size of the of the variable to 500 and its type is NVARCHAR. Next I have declared the Int type variable named @intRowNumber which is used to assign the ID to each of the comma separated value. After the declaration of the both the variable I have set the value of the both the variables.
Declare @strCommaSeparatedValue NVARCHAR(500)
Declare @intRowNumber INT

Set @strCommaSeparatedValue ='Item 1,Item 2,Item 3,Item 4,Item 5,Item 6'
Set @intRowNumber = 1

Declare @tblTemporary Table
(
ItemID INT,
ItemName NVARCHAR(500)
)

DECLARE @strCurrentItem NVARCHAR(500),
@intFirstCommaPosition INT

SET @strCommaSeparatedValue = LTRIM(RTRIM(@strCommaSeparatedValue ))+ ','
SET @intFirstCommaPosition = CHARINDEX(',', @strCommaSeparatedValue , 1)
List 1
Next in the List 1 is the declaration of the table which has only two column the ItemID and the ItemName which are of INT and NVARCHAR type. Which is used to hold the values which are separated by comma and place in this tabel named @tblTemporary. Next I have declare the @strCurrentItem of type NVARCHAR which is used to hold the current item from the CSV. The @intFirstCommaPosition variable is used to hold the position of the first comma from the left side. Now in the next statement which is used to trim the value of the CSV from both side by using the LTRIM which is used to removing leading blanks and RTRIM which is used truncating all trailing blanks and both the LTRIM and RTRIM return the character string and at the end added the last comma in the CSV value so that to access the last item from the CSV. In the next statemetn I have assign the value to the @intFirstCommaPosistion variable by using the CHARINDEX which will returns the starting position of the specified expression in a character string.
Here is the List 2 code which is used separate the CSV value. First the if condition is place to check if there is value in the CSV and user didn't pass only the commas in the string value. In the next statement while loop is place which is used to check the value of the @intFirstCommaPosition, for greater the 0(zero). In the next statement which is use to get the first item from the CSV by using the Left function of the sql server. The left function will returns the left part of a character string with the specified number of characters.
IF REPLACE(@strCommaSeperatedValue, ',', '') <>''
BEGIN
WHILE @intFirstCommaPosition > 0
BEGIN
SET @strCurrentItem = LTRIM(RTRIM(LEFT(@strCommaSeperatedValue, @intFirstCommaPosition - 1)))
IF @strCurrentItem <> ''
BEGIN
INSERT INTO @tblTemporary (ItemID,ItemName) VALUES (@intRowNumber,@strCurrentItem)
END
SET @strCommaSeparatedValue = RIGHT(@strCommaSeperatedValue, LEN(@strCommaSeperatedValue) - @intFirstCommaPosition)
SET @intFirstCommaPosition = CHARINDEX(',', @strCommaSeparatedValue , 1)
SET @intRowNumber = @intRowNumber+1
END
END

SELECT * from @tblTemporary
List 2

After extracting the first element from the CSV , next is to check the current item for the empty string. So if condition is place to check the empty string, so that empty string can't be inserted in the @tblTemporary table. If if condition is true mean the current item is not equal to the empty string then insert it in the @tblTemporary table. Next is to assign the new string to the @strCommaSeparatedValue variable by removing the currently added item in the table. Here Right function is used which returns the right part of a character string with the specified number of characters. Here I have passed the @strCommaSeparatedValue and then then length of the @strCommaSeparatedValue minus the @intFirstCommaPosition, so that the current item is remove which is place before the first comma position. Next assign new value to the @intFirstCommaPosition variable and increment the @intRowNumber.

Note: you can place the @intRowNumber in the if condition where the current item is check for the empty string and then inserted int he @tblTemporary table.So if there is empty string then @intRowNumer is increamented only for the non-empty string values.
Declare @strCommaSeparatedValue NVARCHAR(500)
Declare @intRowNumber INT

Set @strCommaSeparatedValue ='Item 1,Item 2,Item 3,Item 4,Item 5,Item 6'
Set @intRowNumber = 1

Declare @tblTemporary Table
(
ItemID INT,
ItemName NVARCHAR(500)
)

DECLARE @strCurrentItem NVARCHAR(500),
@intFirstCommaPosition INT

SET @strCommaSeparatedValue = LTRIM(RTRIM(@strCommaSeparatedValue ))+ ','
SET @intFirstCommaPosition = CHARINDEX(',', @strCommaSeparatedValue , 1)

IF REPLACE(@strCommaSeperatedValue, ',', '') <>''
BEGIN
WHILE @intFirstCommaPosition > 0
BEGIN
SET @strCurrentItem = LTRIM(RTRIM(LEFT(@strCommaSeperatedValue, @intFirstCommaPosition - 1)))
IF @strCurrentItem <> ''
BEGIN
INSERT INTO @tblTemporary (ItemID,ItemName) VALUES (@intRowNumber,@strCurrentItem)
END
SET @strCommaSeparatedValue = RIGHT(@strCommaSeperatedValue, LEN(@strCommaSeperatedValue) - @intFirstCommaPosition)
SET @intFirstCommaPosition = CHARINDEX(',', @strCommaSeparatedValue , 1)
SET @intRowNumber = @intRowNumber+1
END
END

SELECT * from @tblTemporary
Final Code

Above is the full and the final code, you can copy past it and test it yourself. During this I have learned lot of new thing like the LTRIM, RTRIM , LEFT , RIGHT etc regarding the string manipulation.

Reference
1- Passing a list/array to an SQL Server stored procedure
2- String Functions

All and any comments / bugs / suggestions are welcomed!


Calculating Row Number in Sql Server 2000

During work in the sql server 2005 many of the new thing has been found in the sql server one of which is the ROW_NUMBER() is a new function that is added to the SQL Server 2005 T-SQL syntax. ROW_NUMBER() is used to assign ranks to the result of a query. Here is the sample output of using the Row_Number, the first column contains the serialNumber.

Here is the simple t-sql statements which are used to perform same kind of functionality as the Row_Number function in the sql server 2005.

Use NorthWind

Declare @TotalRecord INT
Set @TotalRecord=(Select Count(*) from Employees )

Select @TotalRecord-(Select Count(*) from Employees where Employee.EmployeeID < EmployeeID) as SerialNumber,
EmployeeName=FirstName+' '+LastName, Title, HireDate, Country from Employees AS Employee
In the above t-sql statement I have declare variable which is used to save the total number of records which is the @TotalRecord. And I have used it in the select statement to subtract the number of record remaining of the current record.
I have used the northwind database and in that database I have used the employees table. Hope you like this post and get some knowledge from this post.

All and any comments / bugs / suggestions are welcomed!


Wednesday, July 15, 2009

10 ways to be liked in your job interview

Everyone wants to make a good impression in job interviews. But did you know that too much smiling or asking too many unrelated questions can circumvent that goal?
I received a press release in my e-mail box this morning for a new career guidance book. Normally, those things go in one eye and out the other, but the title of this book just made me laugh.
The book, I Hate People! Kick Loose from the Overbearing and Underhanded Jerks at Work and Get What you Want Out of Your Job, is written by Jonathan Littman and Marc Hershon. As you know, I favor advice that doesn’t lose itself in the gray areas. Simply stated, there are some tried and true facts about interviewing, and it’s refreshing to see someone point them out in blunt terms.
Here, from the book, are 10 ways to be liked in your job interview. My notes are in brackets following each point.

1. Don’t be a smiley face.
Excessive smiling in a job interview is seen for what it is — nervousness and a lack of confidence. A Smiley Face exudes phoniness, which will quickly be picked up by the interviewer. Instead be thoughtful and pleasant. Smile when there’s something to smile about. Do a practice run in front of a mirror or friend.
[Look, I'm as friendly as the next guy, but if you're wearing a stuck-on smile while I'm describing the rigors of the job, I'll just be creeped out.]

2. Don’t be a Know-It-None
Your job is to be knowledgeable about the company for which you’re interviewing. Random facts about last night’s episode of Dancing With The Stars episode or your favorite blog will not get you the job. Never feel you have to fill an interview with small talk. Find ways to talk about serious subjects related to the industry or company. Pockets of silence are better than padding an interview with random babble.
[I think small talk is OK if the interviewer starts it. But be hyper-aware of your interviewer's demeanor. If he or she starts to zone out, nip it.]

3. Don’t Sweat
You can lose a job by wearing an undershirt or simply a little too much clothing. Sweaty palms or beads on your forehead will not impress. You are not applying to be a personal trainer. Sweat will be seen as a sign of weakness and nervousness. Do a practice run with your job interview outfit in front of friends. The job interview is one place you definitely don’t want to be hot.

4. Put down that Stop Sign
Interviewers are seeking candidates eager to take on challenging projects and jobs. Hesitance and a naysaying mentality will be as visible as a red tie — and seen as a negative. Practice saying “yes ” to questions about your interest in tasks and work that might normally give you pause.
[If you're naysaying in an interview with me, I won't be able to show you the door fast enough. I realize that some people consider naysaying a method for displaying their knowledge of a situation, but if you're negative at the interview stage of the relationship, what can I expect from you as an employee?]

5. Don’t be a Sheeple
Asking the location of the lunchroom or meeting room will clue the interviewer into your lack of preparation and initiative. Prepare. Don’t ask questions about routine elements or functions of a company: where stuff is, the size of your cube and company policy on coffee breaks.
[At first I thought this tip meant that you should wander around aimlessly in the office building instead of asking someone where the interviewer is located. But I think they mean during the interview itself. Good points.]

6. Don’t be a Liar Liar
Studies show that employees lie frequently in interviews. Lying won’t get you the job. In a job interview even a slight exaggeration is lying. Don’t. Never stretch your resume or embellish accomplishments. There’s a difference between speaking with a measured confidence and engaging in BS. One lie can ruin your entire interview, and the skilled interviewer will spot the lie and show you the door.
[I once had a job candidate claim that he had worked at a now-defunct company. The problem is, I'd worked at that company nearly from its inception and knew that he'd never been employed there.]

7. Don’t Be a Bad Comedian
Humor tends to be very subjective and while it may be tempting to lead your interview with a joke you’ve got to be careful about your material. You probably will know nothing about the sensibilities of your interviewer, let alone what makes them laugh. On the other hand, nothing disarms the tension of a job interview like a little laughter, so you can probably score at least a courtesy chuckle mentioning that it’s “perfect weather for a job interview!”
[I've written about the subjectivity of humor in an interview before. When it's done right -- that is, you're engaging in a quip-trading tennis game of sorts with your interviewer -- then all is good. But it's a fine line to walk. Remember, too, that some people have no discernible sense of humor.]

8. Don’t Be High Maintenance
If you start talking about the ideal office temperature, the perfect chair for your tricky back, and how the water cooler needs to be filled with imported mineral water, chances are you’ll be shown a polite smile and the door, regardless of your qualifications. Nobody hiring today is going to be looking for someone who’s going to be finicky about their workspace.

9. Don’t Be A Minute Man
At every job interview, the prospective hire is given the chance to ask questions. Make yours intelligent, to the point and watch the person across the desk for visual cues whether you’ve asked enough. Ask too many questions about off-target matters and you’ll be thought of as a Minute Man, destined to waste the company’s resources with insignificant and time-wasting matters.
[Yes -- don't ask questions just to be asking them or to exhibit your interest. Ask questions that you really want answered.]

10. Don’t Be A Switchblade
Normally the Switchblade is thought of a backstabber, often taking credit for someone else’s work. In an interview setting, the Switchblade can’t help but “trash talk” his former employer. If you make it seem like your former workplace was hell on Earth, the person interviewing you might be tempted to call them to find out who was the real devil.

Reference
1) 10 ways to be liked in your job interview


Saturday, July 11, 2009

Intel collaborated with Google on Chrome OS

A representative confirmed this to us this morning.He said: "We have been privy to the project for some time and we have worked with Google on a variety of projects, including this one. We welcome Google's move here."
The statement is likely to throw Microsoft into total panic. Intel and Microsoft were always "friends", but some have speculated they've always been enemies.


Intel put its weight behind a light weight operating system for netbooks, based on a Linux kernel, and called Moblin. Some had speculated that the Google move would throw Intel, as well as Microsoft, into disarray.It seems not.
Now Intel has put its cards on the table, and it must be up to Microsoft to respond to the direct challenge.Microsoft was unavailable for comment at press time. And could not be contacted for comment.

Reference
1) Intel collaborated with Google on Chrome OS


Adding and Removing Item from ListView Window Control

As I have shifted toward the desktop application using C# 2.0 now I have to learn new things which I have not leaned before. So here is my first post related to the desktop applications and in this post I will discuss the list view control which is mostly used to display records like the micro soft excel sheet display records.. And it is very interested control as well. So let us start with our example. In this example I have two list view control in the form, The list view control which is on the left side is named as lvwFirstListView and the list view control on the right side is named lvwSecondListView. And also two button one which contain two greater then sign (>>) is used to assign value from the first list view control to the second list view control and the second button which contain two less then sign (<< ) is used to assign values from second list view control to the first list view control if there is any check list view item.
When you drag the list view control the it contain the default properties and one of the important property regarding the display of the record is the view property of the list view control. Here are the values of the enum constant of the view property of the list view control
  1. LargeIcon:Each item appears as a full-sized icon with a label below it.
  2. DetailsEach item appears on a separate line with further information about each item arranged in columns. The left-most column contains a small icon and label, and subsequent columns contain sub items as specified by the application. A column displays a header which can display a caption for the column. The user can resize each column at run time.
  3. SmallIcon:Each item appears as a small icon with a label to its right.
  4. List:Each item appears as a small icon with a label to its right. Items are arranged in columns with no column headers.
  5. Tile: Each item appears as a full-sized icon with the item label and subitem information to the right of it. The subitem information that appears is specified by the application. This view is available only on Windows XP and the Windows Server 2003 family. On earlier operating systems, this value is ignored and the ListView control displays in the LargeIcon view.

For my example I have choose detail view of both the list view control. You can change it to what ever your requirement is. Next property which I have set is the CheckBox property.The CheckBoxes property allows you to display a check box next to each item in the list. This enables your application to display a list of items (and subitems if the View property is set to View.Details) that the user can select by clicking the check box. The CheckBoxes property offers a way to select multiple items in the ListView control without using the CTRL key. Depending on your application, using check boxes to select items rather than the standard multiple selection method may be easier for the user. Even if the MultiSelect property of the ListView control is set to false, you can still display checkboxes and provide multiple selection capabilities to the user. This feature can be useful if you do not want multiple items to be selected yet still want to allow the user to choose multiple items from the list to perform an operation within your application.
Next property which I have set is the sorting property of both the list view control.The Sorting property allows you to specify whether or not items are sorted in the ListView control. By default, no sorting is performed. When the Sorting property is set to Ascending or Descending, the items in the ListView are sorted automatically in ascending alphabetical order (when the property is set to Ascending) or descending alphabetical order (when the property is set to Descending). You can use this property to automatically sort items that are displayed in your ListView control to make it easier for users to find items when a large number of items are available. I have set the sorting property of the first list view control to Ascending and for second list view control Descending. Here are the possible value for the sorting property with their description.
Member name
Description
NoneThe items are not sorted.
Ascending

The items are sorted in ascending order.
DescendingThe items are sorted in descending order.

Here is the code which is used to populate the first list view control. Here I have declare the ListViewItem object to add the items in the list view control.The ListView control is similar to a ListBox in that it displays a list of items. The main difference is that the ListView control provides a number of different ways items can be viewed by the user. The ListViewItem class defines the appearance, behavior, and data associated with an item that is displayed in the ListView control. ListViewItem objects can be displayed in the ListView control in one of four different views. Items can be displayed as large or small icons or as small icons in a vertical list. Items can also have subitems that contain information that is related to the parent item. The fourth view style, details view, allows you to display the item and its subitems in a grid with column headers that can be used to identify the information being displayed in a subitem. In the code below I have used the used the listViewItem object and passed the value of the item to the constrctor, and then added the next sub item in the item list by using the SubItems property of th listViewItem object. In this case the value passed to the constructor is placed at column one and the value added using the SubItem.Add will be place at column two and so on if you have more item to display then you can add using the subItem.Add. This piece of code is used in the for loop to add the 18 item in the first list.
ListViewItem item = new ListViewItem ("Item " + intIndex.ToString(), intIndex);
item.SubItems.Add("Some Description for Item " +intIndex.ToString ());

lvwFirstListView.Items.Add(item);


No the code which is used to add remove item from one list to another list. Here is the image of the code which you can find in the source code of this example. Here you can see the first for loop is used to assign the item from the first list view control to the second list view control. Here I have used the CheckedIndices property of the list view control, This property is only useful when the CheckBoxes property of the ListView control is set to true. The CheckedIndices property returns a collection containing the index positions in the ListView.ListViewItemCollection of all items that are checked in the control.


The Second for loop which is used to remove the item from the source list view control as in the above for loop the checked items are moved to the destination list view control. So here I have loop from the maximum checked index to the lower, as if I go start the loop from the lower to maximum index then by removing the first index item, the index of the remaining check item are changed so I go from the maximum checked index to the minimum. And I have used the RemoveAt function of the items collection which take the index of the item which is used to be removed.You can download the source code from here.

All and any comments / bugs / suggestions are welcomed!


Chrome OS for the clueless: What it means for real people

Late Tuesday night, Google, the company that became a tech giant through search and advertising company, announced that it's branching out into an unrelated direction, the operating system business. It will release next year the Chrome OS, a free competitor to Microsoft's Windows operating system. It will be targeted at Netbooks, a class of small, inexpensive computers, although eventually it will make its way to full-powered notebooks and desktop computers. It will be designed for accessing Web applications (like Google's own GMail and Google Docs), and it will take a lot of design and technology cues, as well as its name, from Google's browser, Chrome.
What does this mean to people who are thinking about buying a new computer now, or next year? Is the Chrome OS something to get excited about, or even wait for?
We won't know for sure what the operating system looks like until it comes out, which answers the second question handily: do not wait. If you need a new computer now, spend the money and get the use out of the machine while Google figures out how and when to get the Chrome OS out the door.
But to the other question: yes, this is very interesting, and potentially could cause some transformations in the computer industry, although they may be more subtle than Google--and Microsoft's detractors--hope.


Who cares about operating systems?
Computers need operating systems. Even computers that do nothing but run Web browsers need one. An Application like a Web browser--Internet Explorer, Firefox, Google Chrome--needs to run on top of a platform that gives it access to the hardware resources of the computer (the memory, the persistent storage, access to the networking and communications hardware, the screen, the keyboard, and so on); to peripherals plugged into a computer (printers, cameras that connect, memory cards); to the other software on the the computer (like the system for storing files); and lastly, to you, the user.
Or do they? What if you combined the operating system's functions with a browser's functions, which include accessing and displaying Web pages, keeping track of bookmarks and passwords, and connecting to computer-attached resources like Webcams?
Google is answering that question with Chrome OS. Google is saying, with this product, that the modern computer user spends so much time working with Web-based resources that the main control system for the computer should be the browser, not the operating system. Furthermore, Google sources tell us that the Chrome OS experience will bear little resemblance to existing way that users interact with their computer's main control program. A person familiar with the Chrome OS project told us, "All existing operating systems predate the Web, and the user interfaces are stuck in a desktop metaphor." The Chrome OS, we're led to believe, will be very different.
How? We don't know. It's a safe bet that the Chrome OS will lean more heavily on so-called "cloud storage" products--like Google's own productivity suites, Google Docs--that let users store their data and documents not on their computers but rather on the systems of the Web apps they are running. The great thing about cloud storage is that it's untethered to any individual user's computer. Log in to your Google Docs account from anywhere, and there's your whole workspace, right in front of you. It's liberating.
Google may also take a cue from its own e-mail application, GMail, which blends the traditional idea of having folders for e-mail with the concept of "labels." In GMail, you can drag messages into folders to file them, or you can drag folders (or labels) over messages to categorize them. It's the same thing, but the hierarchy people are used to in operating systems, where a file is in one folder at a time, and the folder may be nested in another folder, is simply not there. Folders and labels are interchangable and far more fluid.
But in Windows 7, Microsoft's next operating system, Folders are also less rigid than they've been in previous versions of Windows.We can also expect that the Chrome OS will borrow user interface elements from Chrome the browser--like a tabbed metaphor for switching between "apps," and the mind-reading command line (address bar in the browser). It may also evidence Google's traditional obsession with clean (if not necessarily attractive) design and speed. The Chrome OS should be fast.

A ruse by any name
But under the hood, the Chrome OS will still be a traditional operating system. It will be an adaptation of Linux, a free operating system lovingly maintained, in various versions, by a global community of programmers. The Chrome OS will likely borrow the gritty bits of the operating system, the parts that connect to the computer's CPU, the memory, and other hardware. Google's most visible contribution, in addition to the human resources it puts on the project of working at the core of the operating system, will be in the user interface and how the OS handles user data and files.
Will users buy it? They haven't so far. The first Netbooks came with Linux-based operating systems, and users shunned them (or more specially, returned them to their points of purchase) in favor of computers running yesterday's version of Microsoft Windows, XP. Even though XP adds cost to a computer due to the high licensing fee that the manufacturers have to pass on to consumers, those consumers voted to pay the extra money for the familiarity of Windows.
The Chrome OS could well be better than any of the Linux variants that have come before it. It will certainly be cheap--Google says it will be free to manufacturers. Google also says it will be safer, thanks to technologies like "sandboxing" from the Chrome browser that prevent one app from infecting or stealing data from another.
But no matter how much better the Chrome OS is than Windows, users are still accustomed to Windows, and the first target market for Chrome OS, the Netbook category, presents special challenges. First, it's a small market, and second, many Netbook buyers get the machines as secondary, portable computers. They already have a larger laptop or desktop and they want a mini-size, portable accessory to go with it. For those users, a radically different operating system is a stumbling block, no matter how good it is by itself.
The stakes are big enough that it's worth the shot for Google. Google makes money through targeted advertising. The more they know about what you do, the better the ads you get will perform. If Google knows what you do at the operating system level, they can deliver you more specific advertising content. Also, a Google OS would likely lead people to Google services--and not Microsoft's or Yahoo's. Also, this is a long-term game. Google doesn't need to knock Microsoft off its peg tomorrow, or next year. But over time, the company may be able to chip away at Microsoft's pre-eminence as the leading operating system vendor, or at the very least force Microsoft to make its own operating systems more Web-friendly, which benefits the most popular Web service provider there is: Google.
Google needs to start spreading the word on the Chrome OS now, and not a year from now when the product comes out, to get developers and computer manufacturers excited about the platform, and working on compatible products. That takes time. It's also an area where Microsoft has an excellent track record; the Windows company spends a ton of money and energy on developer relations.
The most likely short-term impact the Chrome OS will have on the Netbook market is that it may encourage Microsoft to drop its prices on the Windows 7 licenses it sells to manufacturers. But until developers start writing major software for the operating system (games, photo editors, and major productivity suites like Office), it's very unlikely that Google will have much of an impact on Windows sales.
Meanwhile, it's worth noting that Microsoft is hardly standing still. Its new Bing search engine is actually quite good in comparison to Google's most popular product, Google Search, and the upcoming version of Microsoft Office will have Web capabilities that put it in competition with Google's online word processor and spreadsheet.
A year from now, there will likely be Google Chrome OS Netbooks (and possibly larger laptops) available for sale alongside Windows-powered models. Will people like me recommend them? Maybe, for some users, in particular those on tight budgets and those with no or only limited knowledge of Windows or Apple's OS.
Building an operating system is a major project, but it's only part of the job. Even if the Google OS is fantastic, it will need to steal customers accustomed to using Microsoft and Apple devices. And even if those customers want to be convinced that Google's product is better, they may find it very difficult to make the switch.

Reference
1) Chrome OS for the clueless: What it means for real people


Thursday, July 9, 2009

Introducing the Google Chrome OS

It's been an exciting nine months since we launched the Google Chrome browser. Already, over 30 million people use it regularly. We designed Google Chrome for people who live on the web — searching for information, checking email, catching up on the news, shopping or just staying in touch with friends. However, the operating systems that browsers run on were designed in an era where there was no web. So today, we're announcing a new project that's a natural extension of Google Chrome — the Google Chrome Operating System. It's our attempt to re-think what operating systems should be.

Google Chrome OS is an open source, lightweight operating system that will initially be targeted at netbooks. Later this year we will open-source its code, and netbooks running Google Chrome OS will be available for consumers in the second half of 2010. Because we're already talking to partners about the project, and we'll soon be working with the open source community, we wanted to share our vision now so everyone understands what we are trying to achieve.

Speed, simplicity and security are the key aspects of Google Chrome OS. We're designing the OS to be fast and lightweight, to start up and get you onto the web in a few seconds. The user interface is minimal to stay out of your way, and most of the user experience takes place on the web. And as we did for the Google Chrome browser, we are going back to the basics and completely redesigning the underlying security architecture of the OS so that users don't have to deal with viruses, malware and security updates. It should just work.

Google Chrome OS will run on both x86 as well as ARM chips and we are working with multiple OEMs to bring a number of netbooks to market next year. The software architecture is simple — Google Chrome running within a new windowing system on top of a Linux kernel. For application developers, the web is the platform. All web-based applications will automatically work and new applications can be written using your favorite web technologies. And of course, these apps will run not only on Google Chrome OS, but on any standards-based browser on Windows, Mac and Linux thereby giving developers the largest user base of any platform.

Google Chrome OS is a new project, separate from Android. Android was designed from the beginning to work across a variety of devices from phones to set-top boxes to netbooks. Google Chrome OS is being created for people who spend most of their time on the web, and is being designed to power computers ranging from small netbooks to full-size desktop systems. While there are areas where Google Chrome OS and Android overlap, we believe choice will drive innovation for the benefit of everyone, including Google.

We hear a lot from our users and their message is clear — computers need to get better. People want to get to their email instantly, without wasting time waiting for their computers to boot and browsers to start up. They want their computers to always run as fast as when they first bought them. They want their data to be accessible to them wherever they are and not have to worry about losing their computer or forgetting to back up files. Even more importantly, they don't want to spend hours configuring their computers to work with every new piece of hardware, or have to worry about constant software updates. And any time our users have a better computing experience, Google benefits as well by having happier users who are more likely to spend time on the Internet.

We have a lot of work to do, and we're definitely going to need a lot of help from the open source community to accomplish this vision. We're excited for what's to come and we hope you are too. Stay tuned for more updates in the fall and have a great summer.


Reference
1) Introducing the Google Chrome OS


Sunday, July 5, 2009

Validator Summary Control

In this post I will to explain you how you can use the validator summary control of the asp.net. You have used required field validator, regular expression validator range validator etc, which are used to display the message for the controls, depend on the location of the control where they are placed. I think it is better to display all the message on same location so that user can read them and correct the error for the input. So you can use the validator summary control to display all or some of the message on the same place so that user can read all the message at same place. Here is the simple main screen of the example which is used for the validator summary control


In the above screen you can see that I have only two text box control and two button control. So I have two required field validator control one for the user login name and second one for the password, So if you didn't enter any thing in any of these text box then the message will be displayed. Last and the important control is the validator summary control which is used to display the both the message at top of the controls. Let us start with the validator summary control what properties are offer by the control and how you can use them.
The first Property is the display mode of the validation summary. Here is the list of mode which you can use to display the summary of the message.
Member name
Description
ListValidation summary displayed in a list.
BulletList

Validation summary displayed in a bulleted list.
SingleParagraphValidation summary displayed in a single paragraph.
For this example I have set the display mode of the validator summary to be bullet list mode. Next interest property of the validator summary control is the ShowMessageBox.This property can be used in addition to the ShowSummary property to control where the validation summary is displayed. If this property and EnableClientScript are both set to true, the validation summary is displayed in a message box. If EnableClientScript is set to false, this property has no effect. When you set the showMessageBox property of the validator control to true, the message layout depend on the display mode property of the validator control. If you set the list to the display mode then the message shown in the in the alert dialog is in the form of list and so on for the ButtletList and SingleParagraph enum constant.
Now next is to set the properties of the other validator control so that there message can be displayed on the validator summary control.The error message displayed in the ValidationSummary control for each validation control on the page is specified by the ErrorMessage property of each validation control. If the ErrorMessage property of the validation control is not set, no error message is displayed in the ValidationSummary control for that validation control. You can also specify a custom title in the heading section of the ValidationSummary control by setting the HeaderText property.
Here is the output of the page when user didn't enter any thing in any of the Text box control. You can also see that I have set the header text of the validator control.

One last point about the validator summary control is that at the beginning of this article I have said that you can display all or sum of the message on same page to validator summary control, by using the ValidationGroup property of the validator control. If you set this property and give name to the validationgroup property then the validator control will only display the messages of the validator which have same validation group name. And you have to set the validation group property of the button control as well if you want to validate the controls. In my example I didn't set the validation group name property , but I have set the causeValidation property of the cancel button to false which means when cancel button is press no control validation occures. But if you set the causeValidation property of the cancel button to true ,and then you press the cancel button the validation occures and validation summary will be displayed.You can download the source code from here.

All and any comments / bugs / suggestions are welcomed!


JavaScript Debugging Techniques in IE 6

Microsoft’s Internet Explorer 6 is almost universally hated by web developers. It’s hard to work with and support, but with a few solid techniques, you can make the process less painful. What “just works” in the majority of browsers will almost always require hours of tweaks and workarounds to get it working in IE6. With more and more users switching over to newer alternatives such as IE8, Safari and Firefox hopefully support for IE6 can be dropped sooner rather than later. In the mean time though many of us have to make sure our sites work in this awful browser.
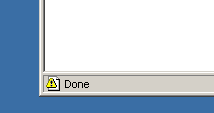
To make things worse, IE6 is extremely bad at helping developers diagnose problems. When a JavaScript error occurs, IE6’s default behaviour is to display a small error icon in the status bar. Extremely easy to miss!


Double clicking on this icon will display a popup, and if you then click the “Show Details” button you’ll get the actual details of the JavaScript error. Unfortunately the detailed error message can be quite cryptic, and probably not too much help in diagnosing the actual problem. Your best bet is to make a note of the line and column number of the problem and then look that up in the source code. Fortunately, with the help of Visual Studio and by changing a few IE settings, we can make it much easier on ourselves.

Setting things up
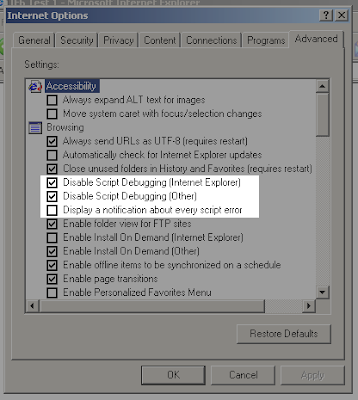
To enable JavaScript debugging in IE we need to change some default settings, which can be accessed from the Tools> Internet Options menu, and then the Advanced tab. The image below shows the default IE6 settings, with the three settings we’re interested in highlighted.


Script debugging in IE needs be enabled, which requires us to disable the first option out of the three. If you also want to debug scripts in other contexts (such as Outlook) then disable the second option. Enable the third option if you’d like the JavaScript error dialog to pop up automatically instead of being displayed as a small icon in the status bar.


After changing those settings and restarting IE, we’re ready to start debugging. All of the following examples show Visual Studio 2005, but the same applied to 2008. You can also use the free Web Developer Express Edition if you don’t own a full copy of Visual Studio. Instead of IE prompting you to open the debugger, as it does in the examples below, you’ll first need to create a project and then start the debugger yourself. From that point on everything is the same.

Basic debugging
Let’s start with a simple example. The code below tries to call a function that doesn’t exist:
<script type="text/JavaScript">
functionDoesNotExist();
</script>
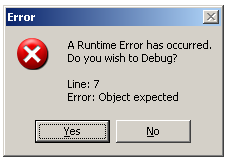
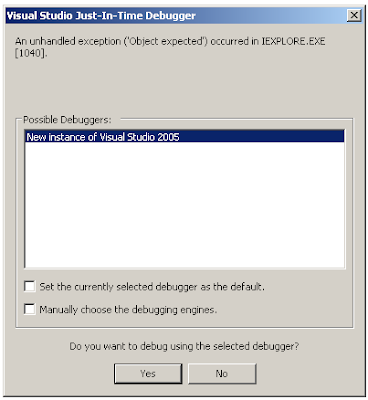
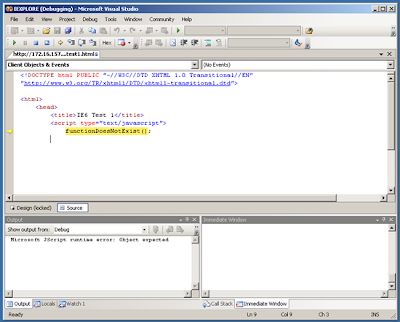
Now when we load that up into the browser instead of the tiny icon in the status bar IE will prompt us to open a debugger.


Selecting Visual Studio and clicking the yes button will open Visual Studio and highlight the code that is the cause of the problem.


For relatively simple errors, such as the one in the example above, just seeing the actual cause of the error highlighted is probably enough for us to work out what has gone wrong, and how to fix it. In more complex cases, however, we’ll need more information. This where the Visual Studio debugging features come in really handy.
In the code below we have a function, performAction, which takes a function as an argument and calls that function once it’s done. You’ll commonly see this sort of thing in JavaScript with asynchronous functions such as setTimeout and jQuery’s Get. There is a problem with the code below though: We’re accidentally passing in a string to performAction rather than a function.
<script type="text/JavaScript">
/**
* Perform an imaginary action, and then
* call the callback function once we're done
*/
function performAction(callback) {
// Perform an action here
// ...
// We're done, call the callback
callback();
}
// Call performAction with an anonymous
// callback function which contains an error
var myFunc = "this is a string, not a function!";
performAction(myFunc);
</script>

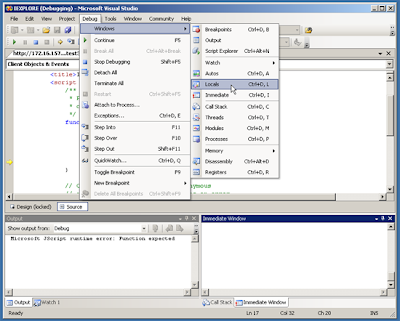
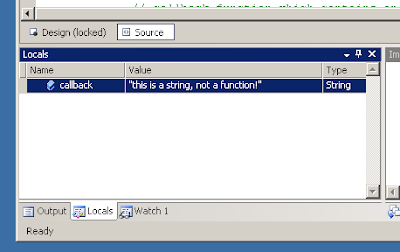
If we load up the code in IE and then debug it in Visual Studio as we have before we’ll see that the code “callback();” is highlighted, and is therefore the cause of problem. It won’t be obvious why this line is causing the problem though, not unless we know what the value of callback is. If callback was actually a function then there wouldn’t be a problem at all. The problem has only arisen because we accidentally passed in a string. This is where the “locals” window comes in handy. It lists all local variables along with their value and type. To display this window go to the Debug menu, then Windows, and then select Locals.

With the locals window displayed it’s clear that the problem is that callback is a string, rather than a function. The locals window doesn’t just support basic types such as integers and strings. If you’ve got a local object you can look at all of its properties and see the value and type of each of them, as we’ll see in the next example.


The ‘debugger’ keyword
The ‘debugger’ keyword, also supported by the Firefox JavaScript debugger Firebug, can really help us to track down problems. Below is a slightly modified version of the previous example, where this time the callback function is passed an object that should include a status and message property. The message property has been misspelled though:
<script type="text/JavaScript">
/**
* Perform an imaginary action, and then
* call the callback function once we're done
*/
function performAction(callback) {
// Perform an action here
// ...

// We're done, call the callback
callback({success: true, mesage: 'The action was performed!'});
}

// Call performAction with an anonymous
// callback function which contains an error
performAction(function(response) {
alert(response.message);
});
</script>

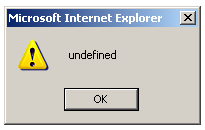
Because ‘message’ has been misspelt as ‘mesage’ in the performAction function when we run this code in IE we’ll see a popup alert with the message “undefined”, rather than the actual message we were hoping to see.
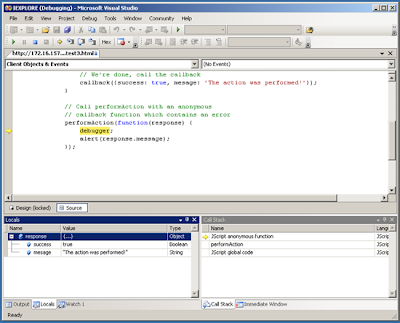
In a large project it can be difficult to track down why a property we expect to exist is undefined. Instead of trawling through lots of code we can simply add the line “debugger;” above the alert statement. IE will then automatically prompt us to debug the code in Visual Studio when it hits that line. From the locals window we can see that the ‘message’ property has been misspelt.


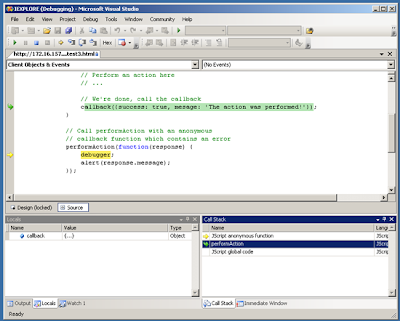
Using the call stack window, which can be accessed in the same way we accessed the locals window, shown at the bottom right of the above screenshot we can work out exactly where this problem occurred. If we double click on the ‘performAction’ line, the previous statement in the call stack, we’ll see the source of the error.

While debugger statements can be a useful tool in helping you track down problems you should be careful not to leave them in your production code!

More advanced debugging
So far we’ve covered some basic examples, such as calling non-existent functions and undefined properties. Using the locals and call stack windows it was relatively straight forward to track these issues down. There are times when the techniques we’ve discussed so far can’t help though. We can’t see what global variables exist or what value they have with the locals window, for example, and the call stack doesn’t always handle remotely loaded or dynamically executed code very well.
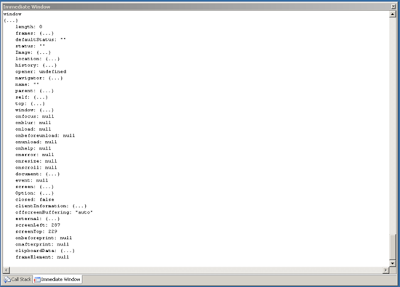
For these situations we must turn to the immediate window. It is by far the most powerful debugging tool that Visual Studio has to offer, allowing us to evaluate JavaScript expressions on the fly.The immediate window can be accessed in the same way that we accessed the other windows. Clicking inside the window will give it focus. We can then type JavaScript statements directly into the window and see the result. For example, type “window” followed by enter and you’ll get a print out of everything in the global scope.

When combined with the JavaScript arguments variable we can look in detail at all the current function arguments and the calling function. While the code in the next example isn’t something you’re likely to see in a real project, it does help to demonstrate techniques that can be extremely useful.

<script type="text/JavaScript">
/**
* This function takes a variable number of arguments.
*/
function performAction() {
// We're just interested in the immediate
// window, start the debugger
debugger;
}

// Call performAction with 4 different arguments, each of a different type
performAction('argument 1', 2, {argument: 3}, function() { return 4; });
</script>
We’ll load this up into IE and then go straight to the immediate window once we’ve opened up the debugger. If we type “arguments” followed by enter we’ll see the following information displayed:

arguments
{...}
[0]: "argument 1"
[1]: 2
[2]: {...}
caller: null
length: 4
The “{…}” tells us that arguments is an object. We also see this next to [2], so we know that the third argument (in array position 2) is an object. We can see what properties this object has by simply typing its name into the window:
arguments[2]
{...}
argument: 3
The fourth argument wasn’t listed in the original output because it’s a function. We know it exists though because the length property tells us that there are 4 arguments. We can also confirm it is there using typeof:
typeof arguments[3]
"function"
Unfortunately the immediate window isn’t quite so helpful with functions as it is objects, and if we type in the name of the function we just see “{…}” rather than any details of the function itself. Fortunately there is a handy workaround. If we type “alert(arguments[3]);” then the function code will be displayed in an alert dialog:
Hopefully these examples have conveyed just how powerful the immediate window is.

Summary
With the help of Visual Studio it is possible to transform IE6 from obscure error messages into an effective debugger. By using the local and call stack windows we can quickly and easily track down the majority of problems. The debugger statement allows us to automatically jump into the debugger at any point in our code. Should we come up again a more complex where the other tools can’t help us then we can always turn to the immediate window, which allows us to execute arbitrary JavaScript to inspect the current environment.


Reference
1) JavaScript Debugging Techniques in IE 6


Friday, July 3, 2009

Five Ways to Speed Up Page Response Times

It’s important for your website to load as fast as possible; users want to see your web pages quickly and if you can’t give them that - then they’ll go somewhere else. In this article, you’ll find a discussion on five simple and effective techniques for speeding up your web pages.

1. Use YSlow to profile and measure your website load times
Knowing how long it takes for your website to load is the first step in determining what’s wrong. It also lets you know if you need to makes changes to your website to speed it up.Before we begin, if you haven’t installed YSlow, please do. It is a Mozilla Firefox extension which can be found at the following link:

First, let’s navigate to the Six Revisions website so we are all working with the same example (just open it in a new tab or browser window).In the bottom right hand corner of your browser, there is a bar with a odometer (see Figure 1). Next to that bar, after the page has completely loaded, you will see ‘YSlow’ followed by a number. That number is the time it took for the site to load (in seconds) in your browser. We want that number to get this number as low as possible.


Most often, what causes such a long page load time is one or a combination of the following:
  • Too many HTTP requests
  • Uncompressed (or non-minified) JavaScript files
  • No expiration headers for static graphic files

We’ll talk about all of this in a moment.

To familiarize yourself with the performance of site load times, travel around a few sites. Check out Google’s homepage, Facebook, and a few of your favorite blogs/sites and you will notice that the more images or JavaScript a site utilizes, the higher the page response time is.


Figure 3: Performance tab shows you a letter grade (A, B, C, D, F) and a percent grade (1-100).

Aside from using a CDN (which can be costly) - everything else is doable.

Grading areas
Let’s run through each grading factor. Here is a brief desciption of what each of these graded areas are, and ways to address them for optimum performance.

Make Fewer HTTP Requests:
HTTP requests happen whenever a web page requests a file from the server. These can range from scripts, CSS files, images, and asynchroneous client-side/server-side requests (Ajax and other variations of the technique).
This is the most crucial area when it comes to performance, and also one that is easily addressed with just a little bit of elbow grease. For example, caching files on the user’s machine often helps, as well as consolidating scripts, CSS, and images.

Add an Expires Header:
80% of the page load time is wrapped up in downloading scripts, images, and CSS. Most often, these elements don’t change on users’ machines. By adding some code to your .htaccess file you can cache the redundant files on the users local machine (we’ll discuss how to do this later down the article).

Gzip Components:
Gziping or compressing JS files, images, HTML documents, CSS files, etc. allows the user to download a much smaller version of a file, increasing the speed of the page load. This can reduce the tax on your server, but unzipping (uncompressing) the components can lead to slower page response times depending on the user’s browser.

Put CSS at the top
:
Putting CSS files at the top of your document allows your site to render your web pages as soon as possible while other components such as images and scripts are still loading.

Put JS at the bottom
:
With your CSS at the top of the document, inserting your JS files just before you close your tag allows you to render what seems to be a complete page to the user while these scripts propagate in the background.

Avoid CSS Expressions:
I personally never use CSS expressions (otherwise called Dynamic Properties), which is an IE-only, proprietary way of adding programming concepts (such as control/conditional structures) to CSS. As of IE8, Trident-based layout engines (which is used in IE) will no longer be supported, so it’s never a good idea to use them anyways. Rather, I script with PHP to
load different CSS style rules based on various conditions, be it a random number, time of day, or browser.

Make JS and CSS external:
Placing JS and CSS in external files allows your browser to cache them making your page load faster than those files loading inline every time the page is called.

Reduce DNS lookups
:
Whenever a user types in a domain name in their web browser address field, the browser performs a DNS lookup to the IP address. The more locations your site has to access, the more DNS lookups that must occur. Do your best to keep these low, on average it takes 60-100 milliseconds to do a DNS lookup.

Minify JS:
Unlike regular gzip compression, minifing JavaScript files is removing the unnecessary spaces, tabs, and various other selected characters reducing the overall size of the file. With a smaller file your able to have a faster page load. You can use JSMIN to minify your JavaScript.

Avoid redirects:
No matter if you do a server-side header redirect, a JS redirect, or an HTML meta redirect, your site is going to load a header with a blank page, then load your new page, increasing the time it takes for a user to get to the actual page they want to go to - So completely avoid this at all costs.

Remove duplicate scripts:
Making your browser load the same script twice will increase your page load. It’s simple math. More files equals more load time. Double check your site and make sure your not calling jQuery 2 or 3 times or any script for that matter.Whew… that was a lot, let’s move on to the next tab of YSlow just before we get into some other techniques to increase the performance of your website.


Figure 4: The Components tab.

The Components tab (Figure 4) gives you insight into what your efforts to increase your site speeds are producing. Here, you can see how long it takes for certain files to load, if those files are gziped, response times, as well as if they are cached in the users machine and when their cache expires. This is good for examining components of your site, measuring their performance and optimizing their speed.
Lastly, we have the Stats tab (Figure 5). This tab shows all the HTTP requests for both the downloaded files, as well as the cached files. The Empty cache shows the files the browser had to download in order to render the page. The Primed Cache, on the other hand, is the list of files that were already in the user’s browser cache, saving the browser from having to download those files again.

Figure 5: Stats tab.

2. Using CSS Sprites to reduce HTTP Requests
CSS Sprites may be the coolest thing since Tesla invented electricity… did I say that.. oops, I meant Edison. Well, not quite, but pretty close.CSS sprites can reduce your page load time simply by reducing the amount of HTTP requests your page makes to the server through the consolidation of your CSS background images.
Most tutorials teach you just to use CSS Sprites for navigation, where I am going to say to use it for the entire user interface of your site.First, let’s take a quick look at YouTube and how they use CSS Sprites (Figure 6). You can find YouTube’s CSS Sprite here:
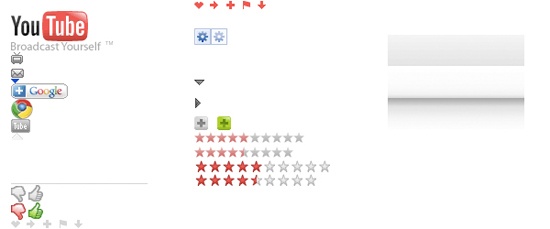
YouTube screenshot of Master Sprite.

What happens is, using CSS, YouTube set a class with this image as the background (pictured above).Then with elements that need to use these images, their class is set accordingly, with the background-position CSS property set to properly align the top and left sides in that element.Let’s give it a try. We are going to use the YouTube Image as an example.
In example below, we rendered the YouTube Logo to the screen. Using the same sprite class, and same image, we are going to create a simple rollover icon.

<style>
.sprite {
background:url(http://s.ytimg.com/yt/img/master-vfl87445.png);
}

#logo {
width:100px;
height:45px;
background-position:0 0;
}
</style>

<div id="logo" class="sprite"> </div>


Now what we’ve done is allowed for all of our static site assets to come from a single HTTP request, which significantly reduces page load. When you use hover with sprites it makes for a seamless transition, unlike when you load the file on the hover state, which leaves a blank space until that file is loaded.
<style>
.sprite {
background:url(http://s.ytimg.com/yt/img/master-vfl87445.png);
}
#logo {
width:100px;
height:45px;
background-position:0 0;
}

#button {
background-position:0 -355px;
padding:5px 8px;
}

#button:hover{
background-position:-25px -355px;
}

</style>

<div id="logo" class="sprite"> </div>

<a href="#" id="button" class="sprite"></a>

3. Load your CSS first and your JavaScript last
With some websites, you simply can’t get around all the HTTP requests, as it disrupts your functionality. So as an alternative, you can "bring out the appetizer" while the "main entree" is finishing up by loading the JavaScript files last.In that regard, here’s a couple of tips:
  1. Load your CSS in your tag above your body.
  2. Load your JavaScript just before you close your tag.

What happens is that the page appears to be loaded on the user’s machine, so their eyes can begin scanning the offerings, all the while the JavaScript is catching up in the rears and loading in the background.Tip: If you don’t want to physically move the JavaScript tags, as you feel it will mess up the way your site works, I recommend using the defer property. Usage is asfollows:

<script defer='defer'>

4. Using Subdomains for parallel downloads
Parallel downloads are when you increase the simultaneous file downloads. If you have your status bar open in your footer, you will notice when traveling other websites making requests to static.domain.com and c1.domain.com.This is a great way to optimize load performance. Although you will simply be using subdomains, and the content is on the same server, the browser see’s it as a seperate server.To set this up:
  1. Create 3 Subdomains on your server
  2. Place your images in a folder in each of the subdomains
  3. Replace the image locations in your site to the paths of the newly create subdomains.

Now with JavaScript files, this doesn’t exceed beyond two parallel at a time.

5. Adding an Expires Header
Some sites are just very rich, even after using the techniques described above, performance seems as if it can be increased even more.A user can go to your website and make all the necessary HTTP requests to render the page, images, scripts, etc. When you use an Expires Header, you can cache those elements on the user’s local machine, not only increasing their speed, but also saving you bandwidth. An Expires header can be used on all your scripts, CSS, and images as well.This can be done simply by adding a line of code to your .htaccess file in the root directory of your site (if you don’t have one, you can create one - use a text editor and save it as .htaccess, then upload it to your root directory).The following .htaccess entry sets a far future expires header sometime in 2010 for file types such as .ico, .pfd, .flv (Flash source files), .jpg, .png, etc.

<FilesMatch "\.(ico|pdf|flv|jpg|jpeg|png|gif|js|CSS|swf)$">
Header set Expires "Thu, 15 Apr 2010 20:00:00 GMT"
</FilesMatch>
Beware: if you make updates to a file that has a far future expires header, you’ll have to rename it (version it) or else users with primed caches won’t see the updates. For example, if you have a JavaScript file that you made updates to, use version numbers and then update all the files that refer to the old version (i.e. javascriptfile-1.0.js, javascriptfile-1.1.js)

Reference
1) Five Ways to Speed Up Page Response Times